
Printer Tips

Deleting printer driver using Print Management


To delete a printer driver, use these steps:

  1. Open Start on Windows 10.

  2. Search for Control Panel and click the top result to open the experience.

  3. Click on System and Security.

  4. Click on Administrative Tools.

  5. Double-click the Print Management option.

  6. Expand the Custom Filters branch.

  7. Click on All Drivers.

  8. Right-click the driver from the right side, and select the Delete option.

    Delete printer driver using Print Management
    Delete printer driver using Print Management
  9. Click the Yes button.

After completing the steps, the printer driver will be gone from your device. If you have additional printers, you’ll need to repeat the steps to completely remove them from your device.


Remove a Printer from the Registry

To remove your printer from the registry, do the following:

  1. Press Windows Key + R and enter regedit. Press Enter or click OK.

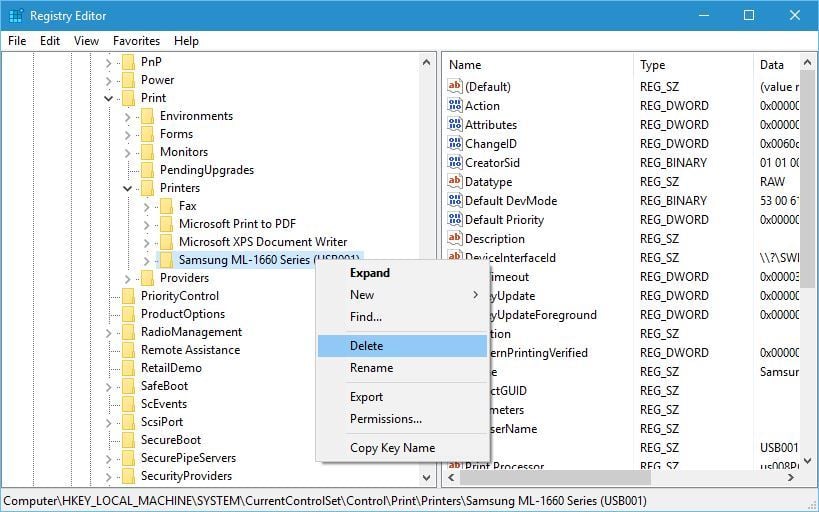
  2. When Registry Editor opens navigate to the HKEY_LOCAL_MACHINE\SYSTEM\CurrentControlSet\Control\Print\Printers key in the left pane.
  3. Expand the Printers key and locate your printer. Right click it and choose Delete from the menu. Be careful not to delete any other key from the registry.
    cant-remove-printer-regedit-2
  4. After deleting the printer key restart your PC.

Comments

Post a Comment

Popular posts from this blog

Enable or Disable “Set Time (Zone) Automatically” in Windows 10 Using Registry Editor

Enable or Disable “Set Time (Zone) Automatically” in Windows 10 Using Registry Editor Press the Windows logo key + R to open the Run box. Type  regedit  and hit Enter. When the Registry Editor opens, navigate to the following key: HKEY_LOCAL_MACHINE\SYSTEM\CurrentControlSet\Services\W32Time\Parameters In the right pane you can see a string value named  Type . If you want Windows 10 to set time automatically, set its value data to  NTP . To disable automatic time synchronization, change its value to  NoSync . In order to enable or disable “Set Time Zone Automatically” in Windows 10, navigate to the following key: HKEY_LOCAL_MACHINE\SYSTEM\CurrentControlSet\Services\tzautoupdate Double-click the 32-bit DWORD “ Start ” in the right pane. Set its value data to 3 if you want to make Windows 10 set time zone automatically. If you want to disable “Set Time Zone Automatically” in Windows 10, just set the value to 4. Reboot your computer for the registry changes to take ...

Find your Window licence key from inside Windows

Entering the following lines into an  admin Command Prompt  or PowerShell worked to display the OEM key embedded in our system's UEFI/BIOS. However, these commands didn't return any keys on other two machines we used for testing despite Windows 10 being activated. wmic path softwarelicensingservice get OA3xOriginalProductKey or powershell "(Get-WmiObject -query ‘select * from SoftwareLicensingService’).OA3xOriginalProductKey" There's also a commonly cited Visual Basic script that retrieves registry-based Windows keys (not those stored in the UEFI/BIOS). You can download the  script here . Copy this text and paste it into Notepad, saving it as a .vbs file. Then double-click to launch the file.